Please help with fixing broken Kobiwako Clay Teapot

Post Reply
vuanguyen
Posts: 105
Joined: Mon Mar 02, 2020 6:06 pm
Location: San Jose, California

Sun Mar 22, 2020 2:34 pm

Hello everyone,

I accidentally dropped the lid and broke my 2 week old 60ml Kobiwako Clay Teapot by Junzo Maekawa this morning :( I love this pot so much.

Can anyone with experience in fixing teapot tell me what is the best way to fix this? More specifically, what material/glue should I use to fix this?

Thank you so much in advance.

Vu
Attachments
IMG_2365.JPG
IMG_2365.JPG (128.12 KiB) Viewed 6371 times
IMG_2363.JPG
IMG_2363.JPG (119.4 KiB) Viewed 6371 times
.m.
Posts: 878
Joined: Wed Oct 11, 2017 3:26 pm
Location: Prague

Sun Mar 22, 2020 2:44 pm

Stay away from superglue. Use a two parts epoxy glue instead. Some are better then other, but i can't tell which one are good. (I have Gorrilla glue epoxy in my drawer, but don't like it. And I don't like fast setting glues.). Make sure you get the right ratio of the two parts and mix them well together. If some of the glue gets out of the seam, wait until it half-dries (has sort of plastic like consistency), and cut it off with a sharp knife, it is safer then cleaning when wet and smearing it all over.
User avatar
pedant
Admin
Posts: 1516
Joined: Fri Sep 29, 2017 4:35 am
Location: Chicago
Contact:

Sun Mar 22, 2020 4:18 pm

thanks for posting good pics.

great news -- that's one of the best ways you can break a teapot. it's a clean break with only one piece to glue. also, the break is all external (nothing touching liquid).

i would use an epoxy like JB-Weld ClearWeld:

https://www.jbweld.com/product/clearweld-syringe


if you do not have experience working with epoxy or with gluing things in general, here are some tips:

before you apply the glue, practice assembling the broken pieces. do this many times. for really important things, i practice 10 times in a row or more. depending on the break interface, sometimes perfect assembly isn't crisp and obvious by feel. visually examine it and run your fingernail over the interface. when you're ready, you should be able to quickly get perfect alignment without fiddling and tweaking.

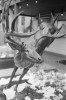
if possible, clamp the workpiece while the glue cures. in this case, you should be able to easily do that with a rubberband. again, practice before gluing and make sure the rubberband is stable and doesn't bring the pieces out of alignment. you don't want any surprises when you actually glue it. i suggest leaving the rubberband on the lid and practice just slightly repositioning the band to clamp the knob.

Lid repair: rubberband clamp
rubberband_lid_clamp.jpg (50.31 KiB) Viewed 6340 times

for the glue, dispense it onto thick paper. you can use a magazine cover or a glossy piece of junk mail or something.

be very careful to dispense equal amounts of both parts of the glue. if you don't, the chemical ratio will be off, and the glue may not cure correctly. this can result in reduced bond strength, lasting tackiness, and enduring chemical odor. the dual-syringe helps with that, but sometimes one side of the syringe starts dispensing before the other one, so pay attention. for this reason, dispense at least a nickel-sized portion. there should be unused glue at the end, and that's ok. save the unused remainder of the blob and monitor it over time. you can use it to retroactively verify that you did a good job. when it fully cures, the entire thing (including the edges) should be firm and odorless. you may also observe that it continues to harden over a period of several days. after 24h, you may be able to dent it with your fingernail, but after many more days, that may no longer be the case.

it's also critical to mix it up very thoroughly with a toothpick. you should spend a solid two minutes mixing it. be sure to incorporate the edges of the blob. use a second toothpick to scrape potentially unmixed glue off of the first toothpick and mix that back into the blob.

before you glue your teapot, practice preparing the epoxy and check it the next day. is the blob totally solid and odorless? practice, practice, practice. see a theme here? :mrgreen:

the epoxy i recommended sets up in about 5 minutes depending on temperature. you can use this to your advantage. sometimes letting it thicken up a little before application makes things easier.

finally, try to avoid bleedout due to excess glue. if minor bleedout happens, i recommend just waiting until it cures, and then you can carefully remove the bead with a razor blade.
vuanguyen
Posts: 105
Joined: Mon Mar 02, 2020 6:06 pm
Location: San Jose, California

Mon Mar 23, 2020 11:56 am

Thanks for your help guys!!!

Just wondering if I can sand down the excessive epoxy glue from the outside with sanding paper.
Attachments
IMG_1210.JPG
IMG_1210.JPG (118.61 KiB) Viewed 6280 times
User avatar
pedant
Admin
Posts: 1516
Joined: Fri Sep 29, 2017 4:35 am
Location: Chicago
Contact:

Mon Mar 23, 2020 1:06 pm

if i may critique.. it looks like there was decent bleedout from overapplication, and it was wiped around when still wet to try to remove excess.

just for future knowledge, you're better off waiting for it to fully or partially cure before messing with bleedout instead of smearing it when wet. this is because that clay surface is pretty porous, and you want as little unintentional contact area with epoxy as possible.

like @.m. said, waiting for partial cure (solid yet rubbery) is good because it's easier to cut. however, if the glue job is very delicate, and monkeying with it puts it at risk of disturbing the joint, you're better off waiting until full cure. for this situation, since the interface is big and not that delicate, cutting the bleedout when it's not fully cured is probably what i'd do.

best solution though is obviously to use less epoxy to reduce or eliminate bleedout in the first place. you can also practice by preparing scrap pieces of similar contact area and porosity and seeing how much epoxy you actually need.

but back to your question, i'm not sure what would work best between a razor blade and sandpaper. i suggest being gentle and going slow so that you affect the surface as little as possible. the good news is the surface is already rough, and the skin is the same color as the interior. so maybe it won't be so noticeable if you sand and scrape.

another thing you could try is dripping a bit of acetone on there. i don't think it will dissolve, but maybe it will soften up a bit. not sure.
User avatar
Victoria
Admin
Posts: 3045
Joined: Sat Sep 30, 2017 3:33 pm
Location: Santa Monica, CA
Contact:

Mon Mar 23, 2020 3:04 pm

I might try and soak knob in acetone to remove as much epoxy as possible and ideally then start over. Practice glueing on other broken pieces before actually using on special teaware etc. then carefully follow pedants advice above. Or, just leave it and try not to look at knob :)
vuanguyen
Posts: 105
Joined: Mon Mar 02, 2020 6:06 pm
Location: San Jose, California

Mon Mar 23, 2020 5:14 pm

Using 3M sand paper, I was able to grind down my earlier mistake. Thank you everyone for your help. I had fun on my day off and I got my favorite kyusu back. Yay!!!
Attachments
IMG_1213.JPG
IMG_1213.JPG (141.19 KiB) Viewed 6215 times
User avatar
pantry
Posts: 389
Joined: Tue Mar 12, 2019 10:34 am
Location: US East Coast

Mon Mar 23, 2020 5:24 pm

vuanguyen wrote:
Mon Mar 23, 2020 5:14 pm
Using 3M sand paper, I was able to grind down my earlier mistake. Thank you everyone for your help. I had fun on my day off and I got my favorite kyusu back. Yay!!!
The lid looks great! Good work! :)
User avatar
pedant
Admin
Posts: 1516
Joined: Fri Sep 29, 2017 4:35 am
Location: Chicago
Contact:

Mon Mar 23, 2020 9:58 pm

congrats!
Post Reply