Snapped lid knob - Epoxy DIY? Kintsugi?

kekstee
Posts: 18
Joined: Tue Jul 27, 2021 3:37 pm
Location: Germany

Sun Mar 20, 2022 9:08 am

Well, crap.

The lid slipped from my hands pretty low above the pot and hit it in just the right angle to snap the lid knob clean off.
I guess the good news is that it's a very clean break in a non visible spot?
DSC_5889.jpg
DSC_5889.jpg (228.49 KiB) Viewed 6217 times
Now... while it's still perfectly usable I HAVE to fix this.

My first impulse would be an epoxy (can this even be called Kintsugi just because it has some gold powder?) kit that's reasonably food safe.
https://itsyonobi.com/en-de/products/ki ... 6936739863
Any tips from experienced teaware droppers?
User avatar
teatray
Posts: 259
Joined: Sun Dec 12, 2021 4:46 am
Location: Sofia, Bulgaria

Sun Mar 20, 2022 9:37 am

I watched this intro video a while ago, covering just the basic idea:


It seems repairing using food-grade glue + gold powder is (relatively) common in Japan, if the break allows it & the item doesn't warrant hiring a professional kintsugi craftsman using traditional methods.

Can't help with choosing materials or a set. All I can say is I highly recommend trying some careful kintsugi. I repaired an old pot of mine using just glue and without much care years ago (also replaced rusty mesh filter with a Chinese spiral). It's my hojicha pot now and I've come to really like it, and regret not taking more time & effort repairing the handle.

oldkyusu.jpg
oldkyusu.jpg (358.01 KiB) Viewed 6212 times
User avatar
Victoria
Admin
Posts: 3045
Joined: Sat Sep 30, 2017 3:33 pm
Location: Santa Monica, CA
Contact:

Sun Mar 20, 2022 10:54 am

With knobs I’ve just used JB-Weld ClearWeld Quick Setting Epoxy. Clean and strong.

3AF758A7-56E8-489F-8D07-84F4BE732FC9.jpeg
3AF758A7-56E8-489F-8D07-84F4BE732FC9.jpeg (65.06 KiB) Viewed 6197 times
User avatar
debunix
Posts: 1817
Joined: Sat Oct 21, 2017 1:27 am
Location: Los Angeles, CA

Sun Mar 20, 2022 1:19 pm

My next repair job, after a lot of reviewing in many topics and elsewhere with lots of googling, is going to be a combination of clear JB Wells and mica powder. I’m very excited to try it out, although I am very sad that I broke the plate that is going to be my guinea pig. If it works well, I have quite a lineup of items to be worked on. I’m not even sure quite how many I have.… I know that I have squirrels away at least five or six things that I cared enough about to find all of the pieces, wrap them up carefully, and store them safely and well protected boxes.

I will report back here on my techniques and how it works when I’m done, but it won’t be probably for another month I think I will be saving that as a project to do the next time I come to visit mom: it is the sort of thing I would like to do for the first time, at least, in the house that is not full of cat dander and cats who are curious enough to knock things over. It will be much safer for the items that I’m working on that way.
User avatar
teatray
Posts: 259
Joined: Sun Dec 12, 2021 4:46 am
Location: Sofia, Bulgaria

Sun Mar 20, 2022 2:40 pm

BTW, it seems using food-grade epoxy for fixing parts that come in contact with hot water may not be a very good idea. This link from an epoxy manufacturer has some interesting info https://www.permabond.com/resource-cent ... bisphenol/.

Key points:
  • "[t]o formulate an epoxy adhesive, one must have either bisphenol A or bisphenol F. Bisphenol A (BPA) is generally preferred for its curing properties. The FDA has said that BPA is safe at the very low levels that occur in some foods. However, the FDA is continuing its review of BPA."
  • "Keep a plastic or resin containing bisphenol A away from heat sources, as heat can encourage leaching. For example, do not leave water bottles made with BPA in your car, even in winter."
  • There seem to be no alternatives(?): "If you are manufacturing an item that requires a food safe epoxy adhesive, (again that means one that is made with ingredients listed in the FDA CFR 21 175.105 and/or 177.300), epoxy is your only option. We are often asked for food safe adhesives that are not epoxy, such as UV curable or instant adhesives (cyanoacrylates). It is not possible to make a UV or Cyanoacrylate from the FDA list of raw materials as the list does not contain the raw materials required."
User avatar
pedant
Admin
Posts: 1516
Joined: Fri Sep 29, 2017 4:35 am
Location: Chicago
Contact:

Sun Mar 20, 2022 3:16 pm

i'd epoxy it with focus on skillful application in terms of amount and position.

amount -- use the minimum necessary for good bond. minimize bleedout. especially interior bleedout.

position -- apply just inside of the outer edge of break interface to minimize amount of bleedout exposed to water (e.g. from condensation at the lid).

kekstee lid knob repair
kekstee-repair.jpg (62.69 KiB) Viewed 6152 times

notice how the interior bleedout is kept away from the tea stain area (to the extent possible for adhesion).
exterior bleedout isn't such a big deal. never, ever wipe off bleedout. wait until it's mostly (solid rubbery consistency) or fully cured before removing it with a blade. in this way it can be scraped off pretty cleanly.

see also: viewtopic.php?p=21747#p21747

for me, a tiny bit of interior bleedout having normally indirect liquid contact is acceptable health-wise.
.m.
Posts: 878
Joined: Wed Oct 11, 2017 3:26 pm
Location: Prague

Mon Mar 21, 2022 3:09 am

Great advices above. One small thing to add: not all epoxies are the same. While a lid knob should not experience much force, it might go through many heat cycles. One of the best epoxies according to their data sheet, that i know of, and that is easily available (not sure about Germany) is JB Weld Original Cold Weld slow setting -- the disadvantage: it is grey. But I'm sure there other good ones - doing some research instead of picking the first on the shelf may pay off. Other than that, make sure to get the correct ratio of the 2 parts by mixing some reasonable minimal amount (which is way more than you'll need). And be sure not to touch the broken surfaces with fingers, to keep them clean.
kekstee
Posts: 18
Joined: Tue Jul 27, 2021 3:37 pm
Location: Germany

Mon Mar 21, 2022 5:41 am

Thank you, very helpful tips so far. Especially the bit about not trying to wipe excess epoxy while fresh.

I've read up on epoxy and food safety as well... some say don't expose it above 70C, others say not boiling. Seems a bit difficult to select a good one in that respect.
No matter how careful I am it might be in pretty long warm contact conditions with water trapped at the base of the knob.

I found a studio offering traditional kintsugi repairs in Berlin, which also shouldn't break the bank for such a small area. Going to inquire there before I make up my mind...
While not an antique this is still a nice YZG pot which I really like and use often :/

(I assume clear epoxy might be almost invisible when done well here, while kintsugi will actually accentuate the seam)
User avatar
Bok
Vendor
Posts: 5785
Joined: Wed Oct 04, 2017 8:55 am
Location: Taiwan

Mon Mar 21, 2022 7:30 am

Jumping on this train: I’ve heard good things about JB marine weld, anyone knows how JB Water weld fares in comparison?

They got a lot of different products with similar functions and descriptions, often the real difference is a bit unclear…
.m.
Posts: 878
Joined: Wed Oct 11, 2017 3:26 pm
Location: Prague

Mon Mar 21, 2022 8:04 am

Bok wrote:
Mon Mar 21, 2022 7:30 am
Jumping on this train: I’ve heard good things about JB marine weld, anyone knows how JB Water weld fares in comparison?

They got a lot of different products with similar functions and descriptions, often the real difference is a bit unclear…
The Water Weld is a putty to fill holes, while Marine Weld is a glue. Both seem to be designed for application in places under constant moisture, with tensile strengths 1300PSI and 5200PSI respectively, and resistant up to 300F temperature, according to their website. The Original Weld has also tensile strength 5200PSI, but with higher temperature rating, up to 500F. The quick setting glues seem to have a bit lower tensile strength and temperature rating. Not sure which one between the Marine and the Original works better on teapots. All I can say that I've had some other epoxies fail over time.
User avatar
Bok
Vendor
Posts: 5785
Joined: Wed Oct 04, 2017 8:55 am
Location: Taiwan

Mon Mar 21, 2022 9:55 am

.m. wrote:
Mon Mar 21, 2022 8:04 am
Bok wrote:
Mon Mar 21, 2022 7:30 am
Jumping on this train: I’ve heard good things about JB marine weld, anyone knows how JB Water weld fares in comparison?

They got a lot of different products with similar functions and descriptions, often the real difference is a bit unclear…
The Water Weld is a putty to fill holes, while Marine Weld is a glue. Both seem to be designed for application in places under constant moisture, with tensile strengths 1300PSI and 5200PSI respectively, and resistant up to 300F temperature, according to their website. The Original Weld has also tensile strength 5200PSI, but with higher temperature rating, up to 500F. The quick setting glues seem to have a bit lower tensile strength and temperature rating. Not sure which one between the Marine and the Original works better on teapots. All I can say that I've had some other epoxies fail over time.
Cheers, that was exactly the kind of info I was looking for!
User avatar
bliss
Posts: 37
Joined: Wed Mar 10, 2021 5:31 pm
Location: Brighton, UK

Mon Mar 21, 2022 10:50 am

For broken knobs, there's a technique of using a thin silver pipe/cylinder that is hammered on either side of the knob and lid to keep it in place. It should provide extra structural support. It seems like a somewhat straightforward request for a silversmith, even though they have no experience with yixing. Could (and probably should) be combined with an epoxy/urushi solution, to avoid play between the lid and knob.

Here are two videos showcasing the technique:

User avatar
teatray
Posts: 259
Joined: Sun Dec 12, 2021 4:46 am
Location: Sofia, Bulgaria

Mon Mar 21, 2022 11:58 am

Wow, looks absolute badass, esp. the second one. Is there any English-langauge info about the craftsman?
User avatar
pedant
Admin
Posts: 1516
Joined: Fri Sep 29, 2017 4:35 am
Location: Chicago
Contact:

Mon Mar 21, 2022 1:57 pm

awesome videos, @bliss. thanks for sharing.

regarding the first vid... i like the repair concept of concentric tubes, but i think he should have drilled bigger holes in the knob and lid to accommodate larger diameter tubes. the inner tube he used is pretty narrow. not good for air exchange when pouring. unless the lid fit is bad, i think it may affect performance. especially for a pot that size.
kekstee
Posts: 18
Joined: Tue Jul 27, 2021 3:37 pm
Location: Germany

Wed Jun 08, 2022 3:01 pm

Ok, feel like I should report back how it went. I have no place to get a professional repair (the kintsugi offer I mailed didn't reply) and couldn't even just go and buy all kinds of JB weld to test with.
So... in the end it was the most straightforward variant. Tiny amount of bog standard JB weld, press on, wait a couple hours to scrape of excess.

Those pictures weren't taken with proper light or a tripod, but you can see what it looks like.
The light gray hairline is pretty much invisible if you don't look for it. Bit risky to do the first attempt on a loved pot, but hey it worked out.
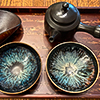
Before:
DSC_5997_01.jpg
DSC_5997_01.jpg (195.14 KiB) Viewed 4980 times
Applied with the tip of a hobby knife:
DSC_5999_01.jpg
DSC_5999_01.jpg (207.52 KiB) Viewed 4980 times
Directly after placing and pressing it on:
DSC_6001_01.jpg
DSC_6001_01.jpg (202.16 KiB) Viewed 4980 times
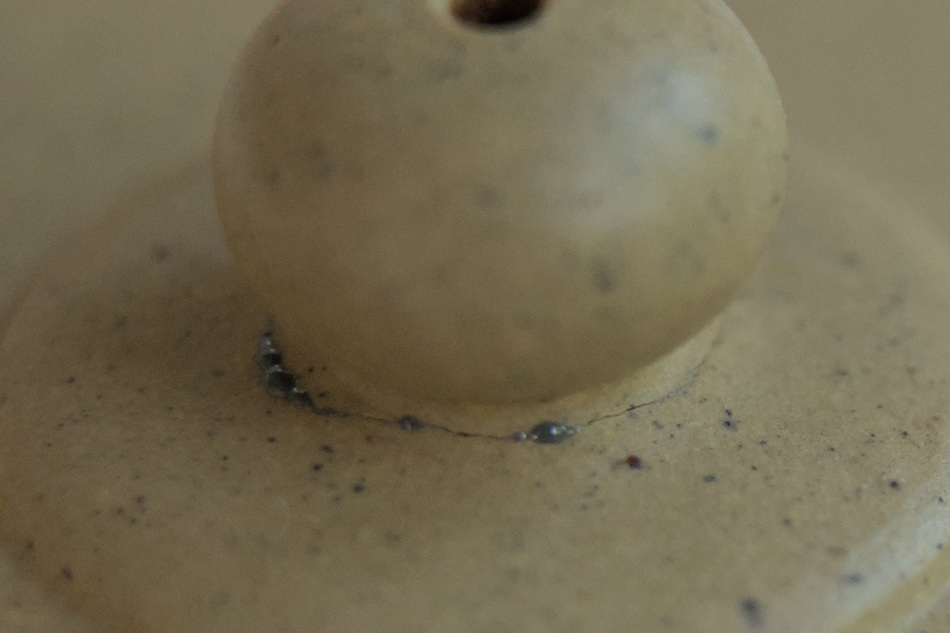
Final result, bit over half is light gray, the other part looks like a fine crack because it didn't spread outwards everywhere.
DSC_6005_01.jpg
DSC_6005_01.jpg (193.27 KiB) Viewed 4980 times
//e if I ever have to do this kind of operation again I might try to get a more consistent line either away from or towards the visible edge I guess? And you could probably use even less, but it's difficult to apply such a small amount.
Post Reply